The Video Streams Component will display local and remote Video Streams within your overlay.
Components are imported directly from within iRacing Live Timing. In iRacing Live Timing press F4 to open the Remote Control Tab and then F2 to enter Edit Mode. Click the Import Library button and select from the list the component you want to import. The component will then be imported to your Remote Control Tab in the first available empty space (often below existing components).
For a full list of all available Overlay Components please check out the Overlay Component List
The Video Streams component displays up to 6 simultaneous video streams in the overlay:
- 2 large Video Streams can be displayed in the middle of the overlay.
- 3 medium size Video Streams can be displayed on the lower right side of the overlay.
- 1 small Video Stream from the currently displayed driver can be displayed next to Driver Details component.
The system is built around the WebRTC technology. It is split into 4 parts :
- The overlay
- A capture web app
- A cameraman web app
- The SDK Gaming central server (Signaling Server)
The example above has been run using 3 capture web apps, 1 cameraman web app and 1 overlay connected to the central server.
Overlay
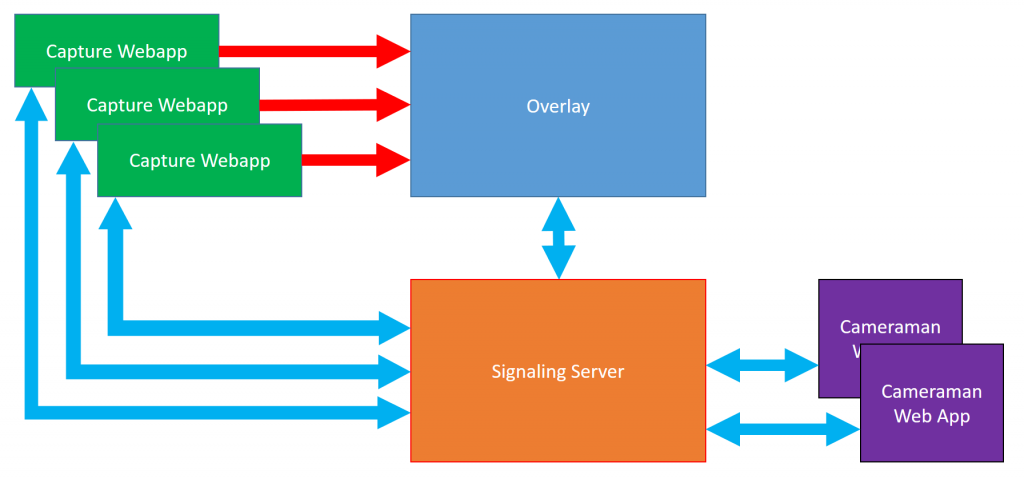
Blue arrows represent data connections
When a Cameraman Web App requests that a source is displayed in a window, the Video Stream component opens a peer to peer WebRTC connection to the corresponding Capture Web App.
The Video Streams component being based on WebRTC technology and WebRTC requiring a secure connection, you must use a room connection for the overlay. Therefore the URL in your OBS etc is: https://livetiming.sdk-gaming.co.uk/f1-overlay.html?room=room_name (replace “room-name” with the room name entered in your iRacing Live Timing).
If the URL is unsecure (http://livetiming.sdk-gaming.co.uk/f1-overlay.html?room=room_name or http://livetiming.sdk-gaming.co.uk/f1-overlay.html?server=localhost:8282) the Video Stream component is completely disabled: it will display nothing and will not respond to requests sent by the Cameraman Web App.
A new display mode has been added to the Driver Details Component and can be activated with the Video button in the Driver Details Component. The Driver Details component is then displayed on 3 lines instead of 2 and a video stream window is displayed next to it when the currently selected driver is sharing a video stream using the Capture Web App.
Capture Web App
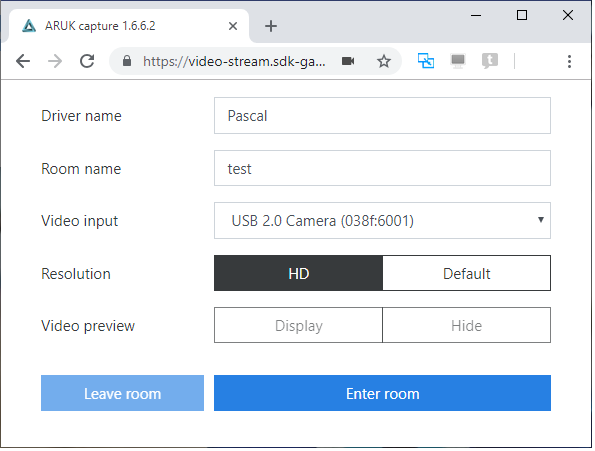
The Capture Web App is used to capture and send a video stream to the overlay. It can be loaded by the user here: https://video-stream.sdk-gaming.co.uk/capture.html. When publishing the Capture Web App the race director or cameraman can add the room as a command line argument to avoid users having to find it. An example: https://video-stream.sdk-gaming.co.uk/capture.html?room=bsrtc. Typical users of this app are drivers and commentators.
The Capture Web App runs on platforms supporting the WebRTC technology: Windows computers as well as Android phones and tablets. Chrome and Firefox browsers provide the best support for WebRTC.
- Driver name – Name used to identify the connected user. This is the name displayed in the Cameraman Web App as well as in the title area of each video stream window in the overlay. Drivers should use their exact iRacing Name (or as set in the broadcasters Driver Overrides). A video stream can only be displayed automatically in the Driver Details component when their iRacing Name is recognized.
- Room name – Name of the room where the overlay, Cameraman Web App, Capture Web App and Signaling Server exchange data for the broadcast. Good practice is to set the Room name as a parameter in the URL as described above to avoid drivers or commentators having to find it.
- Video input – The Video input device is selected using the dropdown box.
- Resolution – Resolution can be set to Default or HD. Default resolution is the resolution that the input device provides when no constraint is set. HD resolution constrains the input device to provide at least 720p resolution if available. Recommended to leave on Default.
- Video preview – Video preview can be set to Display or Hide. When Display is active a video preview window is displayed at the top of the form: it can be used to adjust camera angle and lighting. Video preview state can’t be changed when connected to a room. To minimise resource use, only set to preview when setting up.
- Enter room – When the Enter Room button is pressed the Capture Web App connects to the Signaling Server and asks to enter the given room. If the process is successful a green Connected banner is displayed at the top of the window.
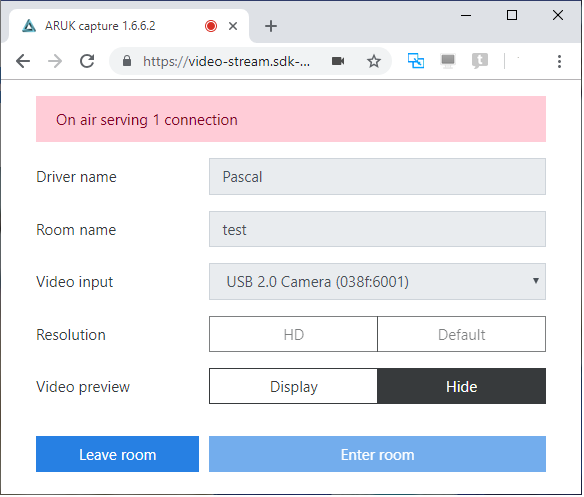
Being connected to the signaling server doesn’t mean that a video stream is being sent. It means that the Capture Web App is waiting for a request from the overlay. When a video stream request from the overlay is received, the application accepts, opens the video stream and displays “On air serving x connections” in a red banner, x representing the number of simultaneous streams the Capture Web App is serving:
- Leave room – When clicking the Leave Room button, all video streams are closed, the user leaves the room and disconnects from the signaling server. All settings in the form are then editable.
Cameraman Web App
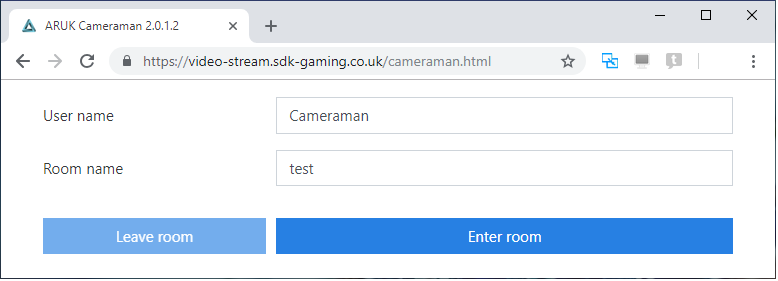
The Cameraman Web App is used by a cameraman to select which video stream is displayed in which window on the overlay. Several cameramen can be connected to the same room. As soon as a cameraman changes a setting in the Cameraman Web App it is automatically reflected in all the other Cameraman Web App‘s connected to the room. The Cameraman Web App can be found here: https://video-stream.sdk-gaming.co.uk/cameraman.html.
In iRacing Live Timing access for the Cameraman Web App needs to be granted from Variable Access Credentials (in your F3 settings). Username needs to be identical in iRacing Live Timing and the Cameraman Web App. In Variable Access Credentials, Variable should be set to “Overlay“.
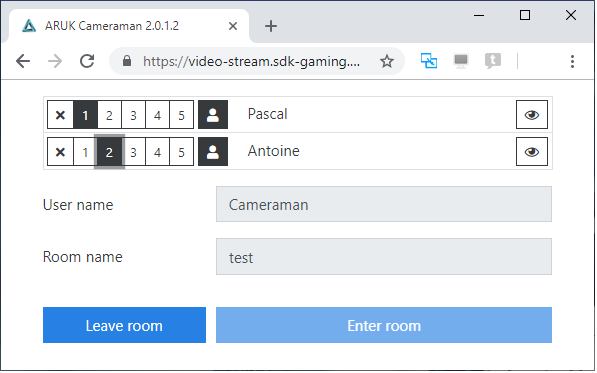
In the following example Pascal is displayed in window 1 and Antoine is displayed in window 2. Both Antoine and Pascal are selected to be displayed in the window in the Driver Details component (User icon is active) when they become the current driver. To hide a driver simply click the cross button on the left.
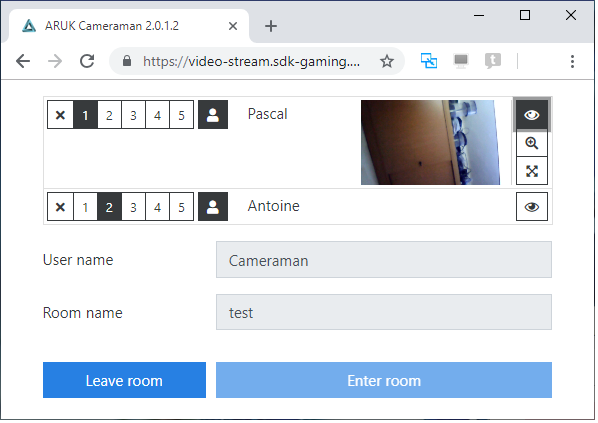
Before sending a video stream to the overlay a cameraman might want to preview the actual stream. Clicking the eye icon next to the driver name opens a connection between Capture Web App and Cameraman Web App and displays the video stream in a small window:
Clicking the Full window button below enlarges the video stream to the size of the window. Clicking in the video reduces the video stream to the previous size. Keep in mind that each preview opens a peer to peer connection: therefore it should be kept to a minimum, usually just a few seconds to check that the content is adequate.
Style Overrides
To customise your overlay we need to override the default CSS code that dictates how an individual component looks, where it is positioned and how it animates etc. In iRacing Live Timing press F3 to open the Configuration Panel, scroll down to find the Style Overrides field and click the 3 dots to open the screen on the left. Copy and paste the code below into the bottom of the Style Overrides window and adjust the values to get the desired effect. Read more information about using Style Overrides here: https://www.sdk-gaming.co.uk/knowledge-base/editing-css-styles/
Add the below to customise the size of the video stream contained within the Driver Details Component. Retain the same ratio between width and height:
.overlay>.driver-details>.video-stream-wrapper>.video-stream {
    width: 236px;
    height: 133px;
}
Windows 1 and 2 are designated “medium” and Windows 3, 4 and 5 are designated “small” in the below code. Retain the same ratio between width and height:
.overlay>.video-streams>.window>.video-stream-wrapper>.video-stream-small {
    width: 420px;
    height: 236px;
}

.overlay>.video-streams>.window>.video-stream-wrapper>.video-stream-medium {
    width: 1175px;
    height: 660px;
}
To adjust the position of each window there are multiple situations to consider. Is Window 1 displaying on it’s own or alongside Window 2? The below code describes each situation.
For example, “.overlay>.video-streams>.window-1” sets the left position as 280px for Window 1 when Window 2 is also displayed. The “.overlay>.video-streams.hide-2>.window-1” sets the left position as 525px for Window 1 when Window 2 is hidden:
.overlay>.video-streams>.window-1 {
    left: 280px;
    top: 300px;
}

.overlay>.video-streams.hide-2>.window-1 {
    left: 525px;
}
The following code follows the same logic for each window combination.
Window 2:
.overlay>.video-streams>.window-2 {
    left: 770px;
    top: 300px;
}

.overlay>.video-streams.hide-1>.window-2 {
    left: 525px;
}
Window 3:
.overlay>.video-streams>.window-3 {
    right: 680px;
    bottom: 40px;
}

.overlay>.video-streams.hide-4>.window-3 {
    right: 350px;
}

.overlay>.video-streams.hide-5>.window-3 {
    right: 350px;
}

.overlay>.video-streams.hide-4.hide-5>.window-3 {
    right: 20px;
}
Window 4:
.overlay>.video-streams>.window-4 {
    right: 350px;
    bottom: 40px;
}

.overlay>.video-streams.hide-3>.window-4 {
    right: 20px;
}

.overlay>.video-streams.hide-5>.window-4 {
    right: 20px;
}

.overlay>.video-streams.hide-3.hide-5>.window-4 {
    right: 20px;
}
Window 5:
.overlay>.video-streams>.window-5 {
    right: 20px;
    bottom: 40px;
}

.overlay>.video-streams.hide-3>.window-5 {
    right: 20px;
}

.overlay>.video-streams.hide-4>.window-5 {
    right: 20px;
}

.overlay>.video-streams.hide-3.hide-4>.window-5 {
    right: 20px;
}
You can hide the header on all windows with:
.overlay>.video-streams>.window>.header {
display:none;
}
I need help, it no longer appears in the SDK application when enabling Video Stream – Show the cameras in the overlay
Hi, Please join the Discord Server linked on the right hand side of this page for Technical Support.