Overview
The main purpose of the plugin system is to extend the features of the overlay with external data, calculations specific to the user and data sent to the overlay by iRacing Live Timing. Data can be displayed in panels using the existing Window Component or through new panels created and styled by the plugin itself.
Users will need to be familiar with JavaScript and HTML to create or edit their own plugins. These are two good resources if you want to learn more about them:
There are 3 levels of data that can be accessed using the plugin system:
- Level 1 (basic): The plugin accesses calculated data or data available on the internet in a database or as a file and displays it in a panel.
- Level 2 (medium): The plugin accesses global data sent by iRacing Live Timing (session state, session time, laps to go, flags etc…) and displays them in a panel.
- Level 3 (expert): The plugin accesses driver data sent by iRacing Live Timing (position, class, gap, interval, colors etc…) and displays them in a panel.
Resulting data can be displayed either in:
- Panels existing in the base overlay. These panels must be static (not updated by the base overlay code) or your data will be overwritten each time a new data packet is received. New Window Components have been added to the overlay specifically for this purpose:
- Window 1
- Window 2
- Window 3
- Window 4
- You can read more about the Window Component here: https://www.sdk-gaming.co.uk/knowledge-base/window-component
- Panels custom built by the plugin. In this case the plugin builds a new panel and all HTML elements inside. The plugin must handle commands sent to it as variable values. When the plugin is stopped, it must also remove all HTML elements, timers and generally all resources allocated.
Plugin Setup
Overlay plugins are added, removed, edited, stopped and started in the iRacing Live Timing plugin manager (Settings / Overlay / Plugins):

- Creating a new plugin:
- Select the last line (the empty one) of the plugin list on the left side of the editor.
- Set a name and version number.
- Enter a short description in the Description field in the top right corner of the editor.
- Enter the plugin JavaScript code in the Initialize, Dispose, Flush and Update tabs of the code editor. A plugin needs at least code in the Initialize tab to run.
- To mark the plugin as active, check the check mark on the right hand side of the plugin entry in the list.
- Click the Apply button to send the new settings to the overlay
- Deleting a plugin:
- Select the plugin to delete in the plugin list.
- Press the DEL keyboard key.
- Click the Apply button to send the new settings to the overlay
- Editing a plugin:
- Select the plugin to edit in plugin list.
- Name, Version, Active state, Description and code can then be edited.
- Click the Apply button to send the new settings to the overlay.
- Stopping a plugin:
- Uncheck the check mark on the right hand side of the plugin entry in the list.
- Click the Apply button to send the new settings to the overlay.
- Starting a plugin:
- Check the check mark on the right hand side of the plugin entry in the list.
- Click the Apply button to send the new settings to the overlay
- Exporting and Importing plugins:
- The complete list of plugins currently in the plugin editor can be exported to a .iRacingLiveTimingPlugins file using the Export button.
- One or more plugins can be added to the plugin list from a .iRacingLiveTimingPlugins file using the Import button.
- Initialize Tab:
- Initialize is called to initialize the new plugins sent by iRacing Live Timing to the overlay. Plugins are sent to the overlay on iRacing Live Timing startup, when loading a project file, when clicking Apply or when clicking Ok in the Plugins editor. This is the place where a plugin should initialize its internal variables (in the this object) as well as allocate resources (HTML elements, timers etc…).
- Dispose Tab:
- Dispose is called to release all resources allocated to the plugin (timer, HTML elements etc…) during Initialize. Dispose is called when loading a project file, when clicking Apply or Ok in the Plugins editor, prior to Initialize.
- Flush Tab:
- Flush is called when the overlay needs to reset all the panel variables. Flush is called on session change.
- Update Tab:
- Update is called whenever the overlay receives a data packet from iRacing Live Timing. This happens 10 times a second. When the overlay receives a data packet it updates rawData and calculatedData then calls the Update code of each plugin. This is the place where a plugin should:
- Update its internal variables and states based on incoming variables.
- Update the HTML elements owned by the plugin in the overlay.
- Update is called whenever the overlay receives a data packet from iRacing Live Timing. This happens 10 times a second. When the overlay receives a data packet it updates rawData and calculatedData then calls the Update code of each plugin. This is the place where a plugin should:
Plugin feature – Level 1 data access | Local Time Example

A plugin can be used to display calculated data in an existing panel. This is a short example displaying current local time in the Window1 Component:
Initialize tab
console.log('initializing digital clock example');

let window1 = document.getElementById('window1');
let dataPanel = window1.children.dataWrapper.children.data;

this.timer = setInterval(panel =>
{
    panel.innerText = new Date().toLocaleTimeString();
}, 1000, dataPanel);

console.log('digital clock example initialized');
Dispose tab
console.log('Diposing timer');

clearInterval(this.timer);

console.log('Timer disposed');
Explanation
- When the plugin is started, the Initialize code is executed.
- First the Window 1 panel is found in the overlay (document.getElementById)
- Then the inner element where time should be displayed is found (window1.children.dataWrapper.children.data). This is the HTML structure of Window 1:
<div id="window1" class="window window-1 hide">
    <div id="header" class="header"></div>
    <div id="dataWrapper" class="data-wrapper">
        <div id="data" class="data"></div>
    </div>
</div>
- Then a timer is started. At each timer tick (every second) current time is converted to a string and written to the data element.
- When the plugin is stopped or removed, the Dispose code is executed: it deletes the timer created during Initialize.
Plugin feature – Level 1 data access | Bitcoin Rate Example

A plugin can also be used to display data fetched from the internet and display it in an existing panel. This example fetches Bitcoin rates from the internet every 10s and displays them in Window 2:
Initialize tab
console.log('initializing data fetch example');

let window2 = document.getElementById('window2');
let panel = window2.children.dataWrapper.children.data;

this.timer = setInterval(panel1 =>
{
    fetch('https://api.coindesk.com/v1/bpi/currentprice.json')
    .then(response => response.json())
    .then(data =>
    {
        panel1.innerHTML =
        data.time.updated + '<br><br>' +
        data.bpi.USD.code + ': ' + data.bpi.USD.rate + '<br>' +
        data.bpi.GBP.code + ': ' + data.bpi.GBP.rate + '<br>' +
        data.bpi.EUR.code + ': ' + data.bpi.EUR.rate + '<br>';
    });
}, 10000, panel);

console.log('data fetch initialized');
Dispose tab
console.log('Diposing timer');

clearInterval(this.timer);

console.log('Timer disposed');
Explanation
This example is very similar to the previous example: it finds the HTML element used to display the data and starts a timer. However, in this example, the data to display is fetched from a website on the internet:
- The fetch command asynchronously reads a file from a website.
- The file being in JSON format is converted to a JS object (data).
- The JS object is displayed as an HTML string; <br> linebreaks are used to format the text.
Plugin feature – Level 2 data access | Session Time Example

A plugin can also be used to access session global data sent every 1/10s by iRacing Live Timing (session state, session time, laps to go, flags etc…) and displays them in an existing panel. The Update code receives 2 sets of data: – rawData contains the data as sent by iRacing Live Timing – calculatedData contains additional data processes by the overlay from rawData The following example displays session time in Window 3.
Initialize tab
console.log('initializing session elapsed time example');

let window3 = document.getElementById('window3');

this.panel = window3.children.dataWrapper.children.data;
this.sessionTime = 0;

console.log('session elapsed time example initialized');
Update tab
let sessionTime = rawData.sessionTimeElapsed.toFixed(0);

if (this.sessionTime != sessionTime)
{
    let s = sessionTime % 60;
    let m = Math.trunc(sessionTime / 60) % 60;
    let h = Math.trunc(sessionTime / 3600)

    this.panel.innerText = `Session time: ${h.toLocaleString('en-US', {minimumIntegerDigits: 2})}:${m.toLocaleString('en-US', {minimumIntegerDigits: 2})}:${s.toLocaleString('en-US', {minimumIntegerDigits: 2})}`;

    this.sessionTime = sessionTime;
}
The list of all rawData variables is available here: https://livetiming.sdk-gaming.co.uk/docs/raw-data-variables.txt
The list of all calculatedData variables is available here: https://livetiming.sdk-gaming.co.uk/docs/calculated-data-variables.txt
Plugin feature – Level 3 data access | Driver Data Example
Plugins can also access driver data sent by iRacing Live Timing (position, class, gap, interval, colors etc…) and displays them in a panel An array of driver object is available in the Update tab as calculatedData.drivers The list of all driver variables is available here: https://livetiming.sdk-gaming.co.uk/docs/driver-variables.txt The following example displays name, number and laps of a list of drivers selected by number in Window 4.

Initalize tab
console.log('initializing driver data example');

let window4 = document.getElementById('window4');

this.panel = window4.children.dataWrapper.children.data;
this.driverNumbers = [1, 3, 13, 4];
this.driverIndexes = [];

console.log('driver data example initialized');
Update tab
let drivers = calculatedData.drivers;
let text = '<table>';

/* Find driver indexes on first call */
if (this.driverIndexes.length == 0)
{
    for (let driverNumber of this.driverNumbers)
    {
        let index = drivers.findIndex(x => x.number == driverNumber);

        if (index > -1) this.driverIndexes.push(index);
    }
}

/* Build HTML table */
for (let driverIndex of this.driverIndexes)
{
    let driver = drivers[driverIndex];

    text += `<tr><td>${driver.name}</td><td>${driver.number}</td><td>${driver.laps.toFixed(2)}</td></tr>`;
}
text += '</table>';

/* Write data to panel */
this.panel.innerHTML = text;
Explanation
- During initialization the panel receiving text is found and an array of cars to display by number is set.
- On first update driver indexes in the driver array are determined to avoid searching for them on each iteration.
- Text to render is built by iterating over each driver to display as an HTML table This rendering method is quite naïve as name and number are set on each iteration but they never change.
Plugin feature – Custom Data Columns
Custom data columns can be added to the F1 style Timing Tower and the Battle Box. To add a new data column to the Timing Tower you need to call standings.registerColumnType in your plugin Initialize tab To add a new data column to the battle panel you need to call battle.registerColumnType in your plugin Initialize tab

standings.registerColumnType and battle.registerColumnType have 3 parameters:
- Tag: the value of the Overlay.TimingTable.DataX or Overlay.Battle.DataX (with X being column number) displaying the column. In this example: LapsLed – CSS class: the CSS class added to the driver wrapper HTML element when Tag is selected.
- Function: the javascript function called when Tag is selected:
- This function has access to the driver variable containing all driver data and to HTML driverWrapper element containing data and data2. data usually displays text data and data2 display the data unit.
- This function must return an object containing 2 strings: dataText and data2Text. These 2 strings will be displayed in the 2 text boxes (data and data2) of the column.
- Check the Laps Led, Fractional Laps and Live iRating provided plugins at the bottom of this page for an example of using this method.
How to debug custom column code:
- Display the overlay in Chrome: https://livetiming.sdk-gaming.co.uk/f1-overlay.html?room=YOUR_ROOM
- Add console outputs to the plugin initialisation. For example:
console.log('initializing timing tower live iRating');

standings.registerColumnType('LiveIRating', 'live-irating', (driver, dataWrapperDiv) =>
{
    let text = (driver.iRating + driver.iRatingGain).toFixed();
    let licenseLetter = driver.licenseString.split(' ')[0][0];

    if (driver[`${dataWrapperDiv.id}${licenseLetter}`] != licenseLetter)
    {
        dataWrapperDiv.classList.toggle('black-license', licenseLetter == 'W' || licenseLetter == 'P');
        dataWrapperDiv.classList.toggle('blue-license', licenseLetter == 'A');
        dataWrapperDiv.classList.toggle('green-license', licenseLetter == 'B');
        dataWrapperDiv.classList.toggle('yellow-license', licenseLetter == 'C');
        dataWrapperDiv.classList.toggle('orange-license', licenseLetter == 'D');
        dataWrapperDiv.classList.toggle('red-license', licenseLetter == 'R');

        driver[`${dataWrapperDiv.id}${licenseLetter}`] = licenseLetter;
    }

    return { dataText: text, data2Text: '' };
});

console.log('Timing tower live iRating initialized');
- Open Chrome devTools (F12 key) – display the info message panel on the lower left (edited)

- Click the VMxx:yy link corresponding to your initialisation message Your code will be displayed. You can then set breakpoints, view variables and single step through the code.
Plugin feature – Building a new panel and its component
Plugins can also build custom panels:
- In this case the plugin creates a new panel in the overlay base and all HTML elements inside the main plugin panel.
- The plugin must also handle commands sent to it by iRacing Live Timing as variable values. When the plugin is stopped, it must also remove all HTML elements, timers and generally all resources allocated. The following example plugin builds a panel called Demo displaying raw text or HTML formatted text sent in the Overlay.Demo.Text variable. The Overlay.Demo.Display variable is used to Show or Hide the Demo panel.
- This panel can be styled using CSS in your Style Overrides editor and can be controlled by creating your own widgets housed in a component.


Initialize tab
console.log('initializing demo panel');

let overlay = document.getElementById('overlay');
let panel = document.createElement('div');

panel.id = 'demo';
panel.className = 'demo hide';

overlay.appendChild(panel);

this.panel = panel;
this.hide = undefined;
this.text = undefined;

console.log('demo panel initialized');
Update tab
let instance = calculatedData.instance;
let display = rawData[`${instance}.Demo.Display`];
let hide = display == 'Hide';

if (this.hide != hide)
{
    this.hide = hide;
    this.panel.classList.toggle('hide', hide);
}

if (!hide)
{
    let text = rawData[`${instance}.Demo.Text`];

    if (this.text != text)
    {
        this.text = text;
        this.panel.innerHTML = text;
    }
}
Style Overrides
.demo {
    position: absolute;
    left: 20px;
    top: 600px;
    width: 300px;
    height: 300px;
    background: #00000080;
    font-family: Arial;
    font-size: 18px;
    color: white;
    padding: 10px;
    transition: 0.3s;
}

.demo.hide {
    opacity: 0;
}
Component
You will need to create the widgets (buttons and text field in this example) in the iRacing Live Timing remote control panel in order to control this new component you have created:
- A Hide button, with variable
Overlay.Demo.Display = "Hide"; - A Show button, with variable
Overlay.Demo.Display = "Show"; - A text field, with variable
Overlay.Demo.Text
Follow the instructions here for how to create and edit widgets: https://www.sdk-gaming.co.uk/knowledge-base/remote-control-tab/
An example Demo Component is available in the Demo.zip file below:
Result
Clicking Show or Hide buttons of the Demo component shows and hides the demo panel with a 0.3s animation as specified in the panel style overrides. Editing the text in the Demo component updates the demo panel text, including HTML format.
Explanation
- Custom panel is created and set as a child of the main overlay panel, its style class and id are also set.
- In Update the hide state is determined from the Overlay.Demo.Display variable and style class is set accordingly.
- If the panel is displayed text change is monitored and text is updated if needed.
There are many possibilities to extend the function of your iRacing overlay using this plugin system together with your knowledge of JavaScript and HTML.
Community Shared Plugins
To add the below plugins to your project file:
- Use the Import button in the Plugin Editor to add the .iRacingLiveTimingPlugins file.
- Use the Import file button in the F2 Editor to add the .RemoteControlComponent file.
- Copy the CSS code into your Style Overrides, or use the Import button within Style Overrides if they have been provided within a .css file.
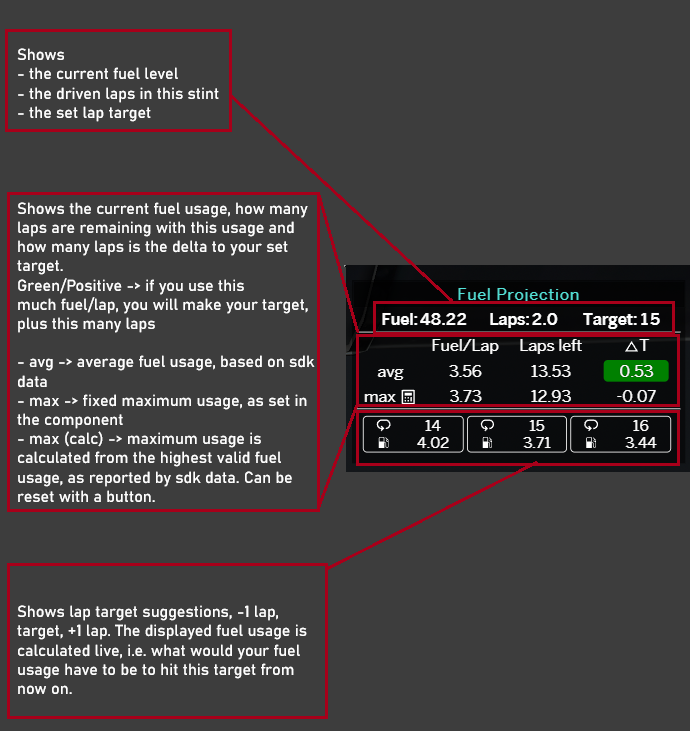
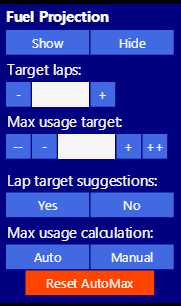
Fuel Projection 2.0
Useful for hitting those lap targets in a stint, and knowing when to push.
Set your lap target and your expected maximum fuel usage per lap.
(The buttons to are all bindable, so you can change them while driving)
The fuel projection window will show the delta to your target laps, compared to your current & max fuel usage (avg & max row).
Positive delta (green) => If you use this much fuel for the rest of the stint, you will hit the lap target.
Negative delta => If you use this much fuel for the rest of the stint, you will NOT hit the lap target.
Additionally, the window will show the fuel usage you will need to make it to your target laps and +/-1 lap. Useful to predict if you can get another lap out of the remaining fuel, compared to your previous target.
Note: If you used the 1.0 fuelProjection plugin, then delete the old plugin, Style Overrides and Component.
Download and extract this Zip file: https://www.sdk-gaming.co.uk/wp-content/uploads/fuelProjection2.zip
Import the component, Style Overrides and plugin into iRacing Live Timing.
Thanks to Michael Hüper for creating and sharing this plugin with the community!
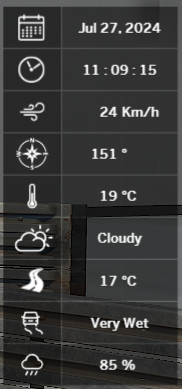
Add track wetness and precipitation percentage to the weather component. Compatible with all Overlay Themes.
Check the plugin description after importing for details and examples of creating custom icons and localisation.
Download the below Zip file, extract and import the plugin into iRacing Live Timing. No other overrides or imports are required.
https://www.sdk-gaming.co.uk/wp-content/uploads/WeatherExt.zip
Thanks to Michael Hüper for creating and sharing this plugin with the community!
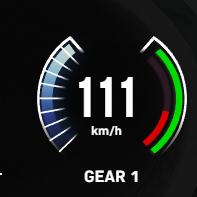
Extend the functionality of the Dashboard when using the WEC overlay theme to include Throttle and Brake inputs (only available when driving, not spectating)
Download and extract this Zip file: https://www.sdk-gaming.co.uk/wp-content/uploads/WECextended.zip
Import the plugin into iRacing Live Timing. No other overrides or imports are required.
Thanks to Michael Hüper for creating and sharing this plugin with the community!
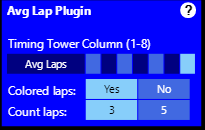
This plugin can display either 3 or 5 last lap averages in the timing tower. Lap times can be coloured for opponents in the same class, relative to the selected driver.
https://www.sdk-gaming.co.uk/wp-content/uploads/LapAvgPlugin.zip
- Download and extract the .zip
- Import the .RemoteControlComponent file into iRacing Live Timing
- Add the styleOverrides.css content to your style overrides
- Import the .iRacingLiveTimingPlugins file into the plugin editor and Apply/Ok
Display a “Laps Led” data column in your Timing Tower
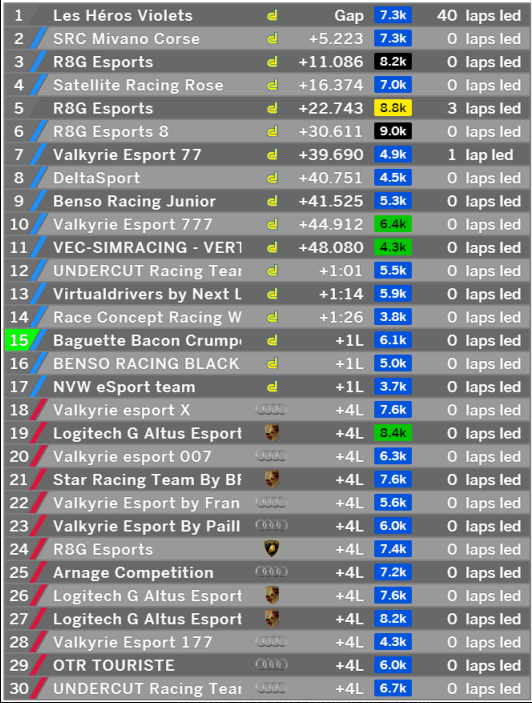
Download and extract this Zip file: https://www.sdk-gaming.co.uk/wp-content/uploads/Laps-Led-Timing-Tower.zip
Import the component and plugin into iRacing Live Timing. Copy the below CSS code into your style overrides:
.standings .data-wrapper.laps-led {
    width: 140px !important;
}

.standings .data-wrapper.laps-led>.data {
    width: 50px;
}

.standings .data-wrapper.laps-led>.data2 {
    width: 80px !important;
}
Display a “Laps Led” data column in your Battle Box
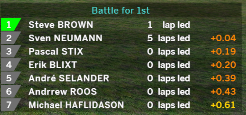
Download and extract this Zip file: https://www.sdk-gaming.co.uk/wp-content/uploads/Laps-Led-Battle-Box.zip
Import the component and plugin into iRacing Live Timing. Copy the below CSS code into your style overrides:
.battle .data-wrapper.laps-led {
    width: 140px !important;
}

.battle .data-wrapper.laps-led>.data {
    width: 50px;
}

.battle .data-wrapper.laps-led>.data2 {
    width: 80px !important;
}
Display a “Fractional Laps Completed” data column in your Timing Tower

Download and extract this Zip file: https://www.sdk-gaming.co.uk/wp-content/uploads/Fractional-Laps-Timing-Tower.zip
Import the component and plugin into iRacing Live Timing. Copy the below CSS code into your style overrides:
.standings .data-wrapper.laps {
    width: 140px !imporatnt;
}

.standings .data-wrapper.laps>.data {
    width: 80px;
}

.standings .data-wrapper.laps>.data2 {
    width: 50px;
}
Display a “Fractional Laps Completed” data column in your Battle Box
Download and extract this Zip file: https://www.sdk-gaming.co.uk/wp-content/uploads/Fractional-Laps-Battle-Box.zip
Import the component and plugin into iRacing Live Timing. Copy the below CSS code into your style overrides:
.battle .data-wrapper.laps {
    width: 140px !important;
}

.battle .data-wrapper.laps>.data {
    width: 80px;
}

.battle .data-wrapper.laps>.data2 {
    width: 50px;
}
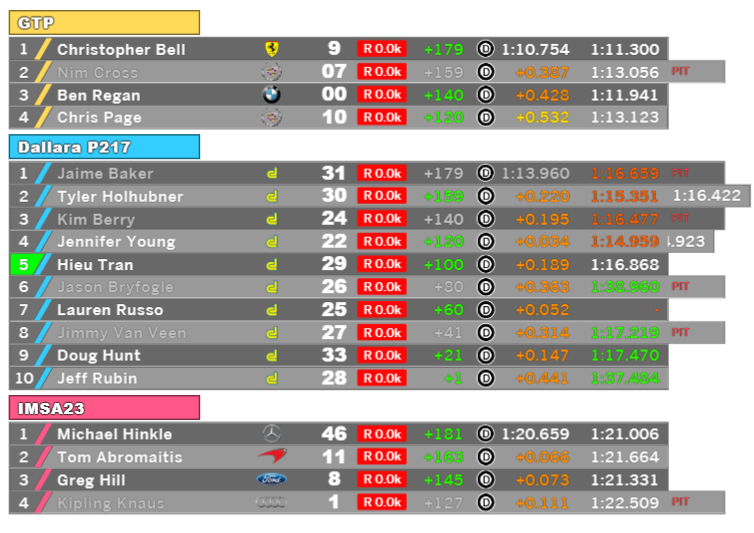
Display a “Live iRating” data column in your Timing Tower
Download and extract this Zip file: https://www.sdk-gaming.co.uk/wp-content/uploads/Live-iRating-Timing-Tower.zip
Import the component and plugin into iRacing Live Timing. Copy the below CSS code into your style overrides:
.standings .data-wrapper.live-irating {
    width: 55px !important;
}

.standings .data-wrapper.live-irating>.data {
    width: 47px;
    height: 21px;
    line-height: 21px;
    font-size: 15px;
    border-radius: 2px;
    margin-top: 3px;
    padding-right: 5px !important;
}

.standings .data-wrapper.live-irating>.data2 {
    width: 0;
}

.standings .data-wrapper.live-irating.black-license>.data {
    background: #000000;
}

.standings .data-wrapper.live-irating.blue-license>.data {
    background: #0153DB;
}

.standings .data-wrapper.live-irating.green-license>.data {
    background: #00C702;
}

.standings .data-wrapper.live-irating.yellow-license>.data {
    background: #FEEC04;
}

.standings .data-wrapper.live-irating.orange-license>.data {
    background: #FC8A27;
}

.standings .data-wrapper.live-irating.red-license>.data {
    background: #FC0706;
}
Display a “Live iRating” data column in your Battle Box
Download and extract this Zip file: https://www.sdk-gaming.co.uk/wp-content/uploads/Live-iRating-Battle-Box.zip
Import the component and plugin into iRacing Live Timing. Copy the below CSS code into your style overrides:
.battle .data-wrapper.live-irating {
    width: 55px !important;
}

.battle .data-wrapper.live-irating>.data {
    width: 47px;
    height: 21px;
    line-height: 21px;
    font-size: 15px;
    border-radius: 2px;
    margin-top: 3px;
    padding-right: 5px !important;
}

.battle .data-wrapper.live-irating>.data2 {
    width: 0;
}

.battle .data-wrapper.live-irating.black-license>.data {
    background: #000000;
}

.battle .data-wrapper.live-irating.blue-license>.data {
    background: #0153DB;
}

.battle .data-wrapper.live-irating.green-license>.data {
    background: #00C702;
}

.battle .data-wrapper.live-irating.yellow-license>.data {
    background: #FEEC04;
}

.battle .data-wrapper.live-irating.orange-license>.data {
    background: #FC8A27;
}

.battle .data-wrapper.live-irating.red-license>.data {
    background: #FC0706;
}