Introduction
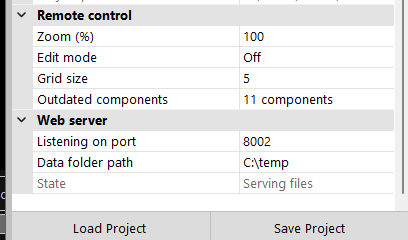
Within the iRacing Live Timing app open up the Remote Control Tab by pressing F4 or click the up arrow at the bottom of the screen. Depending on the project file you have loaded you will now see a selection of Components which controls the information that is displayed on your overlay. For our example we will use the Streamer project file included in your extracted iRacingLiveTiming folder (most likely found in your main Documents folder).
The overlay displaying in OBS or in iRacing Live HUD is split into Components which are controlled mostly from this Remote Control Tab. Each button can either simply Show or Hide a specific component or allows customisation of what information is displayed.
You can find a full list of all components at Overlay Component List along with download links, details on what each component does and example CSS code for changing its appearance.
Importing and Updating Components
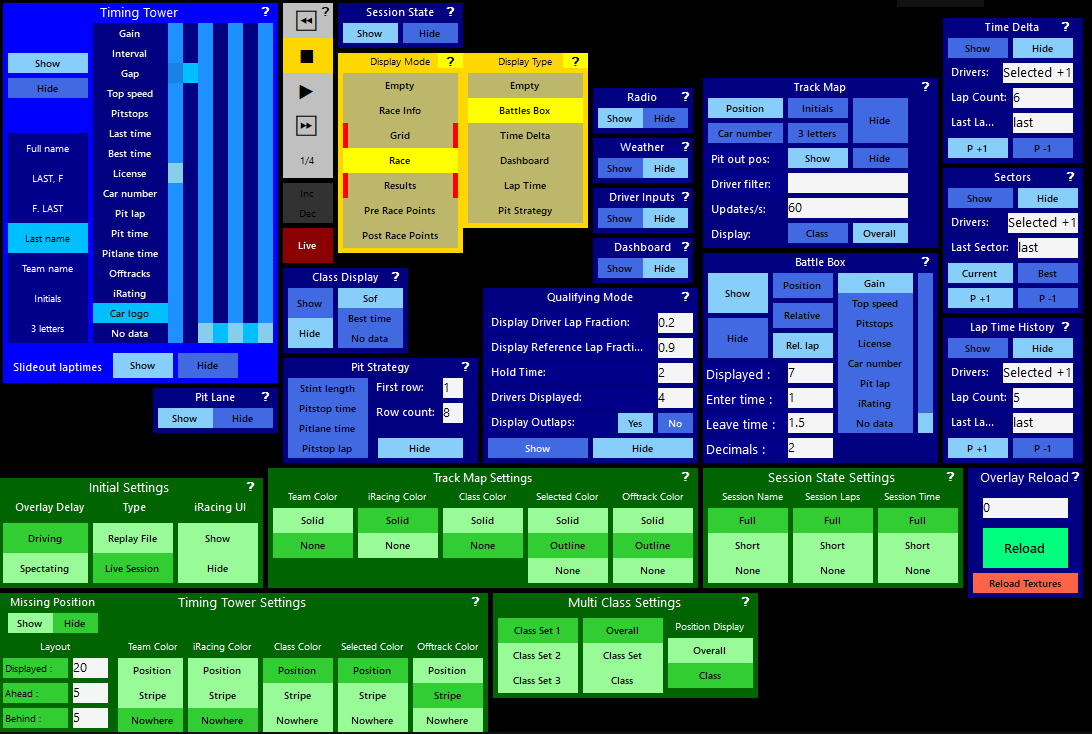
When in Remote Control Edit Mode (F2), the Import button has an Import from Library feature. Use the arrow on the right edge of the Import button to choose between; importing from a file on your PC (where you have already downloaded the component from the website or to import your own customised component) and the Import library.
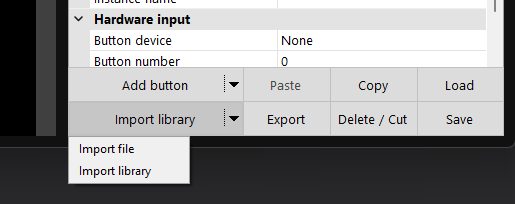
When the Import library has been selected a Component Selection window is displayed.
With the desired component selected, click Details to open the web page for that component, Import to import that component into your project file or Cancel to return to iRacing Live Timing.
Component Updater
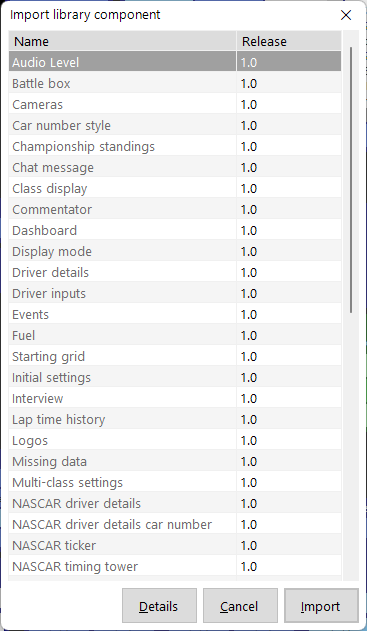
Navigate to F3 Settings / Remote Control / Outdated components to open a window displaying all outdated components in the loaded project file:

Components added to your project file before the release of this Component Updater feature will display as Current Release 0.0. With the desired component selected, click Details to open the web page for that component, Update to update that component or Cancel to return to iRacing Live Timing.
Editing Buttons and Components
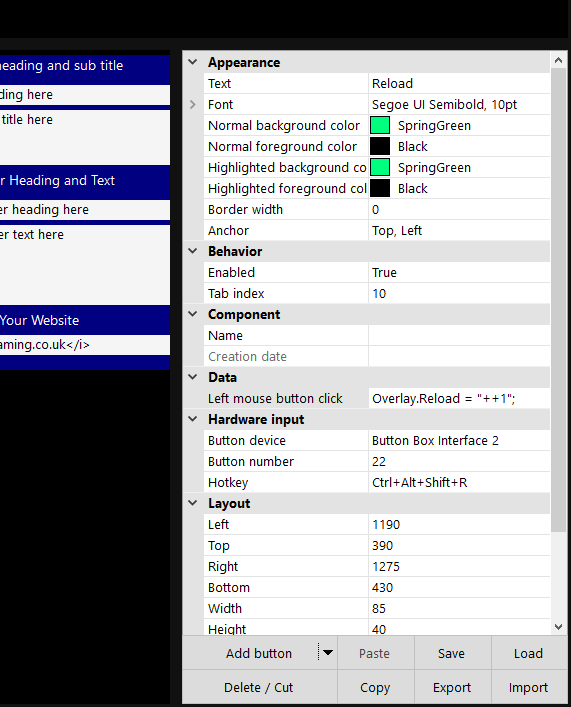
With the Remote Control Tab open, press F2 to open the Edit Panel. The Edit Panel allows you to add widgets (buttons, text fields, lists, labels and links) as well as edit the properties of any widgets you select. If you Alt+Left Click a widget in the Remote Control Tab, then all widgets attached to the same Component will be selected. You can now easily re-position the entire component within the Remote Control Tab, Delete, Import or Export the component from the options on the Edit Panel.
By only Left Clicking a widget you can resize or re-position the individual button as you wish. When you select a button you can see a number of fields in the Edit Panel, you can now:
- Change the appearance of the widget
- Change which component the widget belongs to
- Edit, Add or Delete Variable Values assigned to that widget (buttons, text fields and lists only).
This last item can be very powerful for customising your overlay. We will look at it in more detail next.
Editing Widget Functions
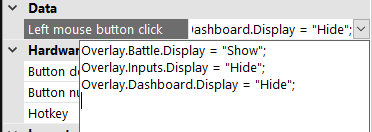
Perhaps we created a new widget or edited an existing one and want to add additional functionality to it. You can copy and paste the Left Mouse Click Variable Value from any other button in the Remote Control Tab into this new button.
To demonstrate let’s set a button to simultaneously display the Driver Details, Driver Inputs and Track Map on our overlay at the same time:
- With the F2 Edit Panel open, click on the Show button in the Remote Control Tab for one of the above components.
- Copy the Left Mouse Click Variable Value simply by highlighting and Ctrl+C.
- Now select your newly created button and paste into its Left Mouse Click field.
- Rinse and repeat for as many components as you want to display.
- Press F2 again to close the Edit Panel and the new button now displays multiple components from one click.
- You probably want a hide button also, so open the Edit Panel again and select the newly created button. Click the Copy option in the Edit Panel and then Paste, this creates a duplicate button. Re-position this new button (and rename it), select the Left Mouse Click field again and you can now quickly change each Show command to Hide and now this button hides all of the same components from this single click!
- Perhaps you want to have the Timing Tower set to Hide when you Show your Twitch Chat. You can use the same method again to create any combinations you want, similar to the image.
You can find a full list of all components at Overlay Component List along with download links, details on what each component does and example CSS code for changing its appearance.